Setting up SSH Authentication with Git
When we are working for multiple clients or handling multiple client projects often times we see that each client has their git server in GitHub or GitLab or Bitbucket either in self-hosted model or subscribed to GitHub enterprise versions. Each client’s git server URL is different, and we are provided with a unique git account username.
Let me explain the way I do it. I generally work on some projects that live in GitHub, GitLab. In order to push code from my machine, I have to authenticate myself with GitHub, GitLab. There are 2 ways to authenticate either with https or ssh. These options can be observed when we to try to clone a repo from GitHub or GitLab. SSH based authentication is recommended over HTTPS for some of these reasons.
- Security: SSH authentication provides a more secure way of authentication as it uses public-key cryptography to authenticate the user. This means that the private key is never transmitted over the network, making it less susceptible to eavesdropping or man-in-the-middle attacks.
- Convenience: Once we have set up SSH authentication, we can easily connect to your remote server without having to enter your password every time. This is especially useful when we need to perform multiple operations on the server, as it saves we time and effort.
- Speed: SSH authentication is generally faster than HTTPS, as it does not require the overhead of SSL/TLS encryption. This means that we can transfer files or perform operations on the server more quickly.
- Control: With SSH authentication, we have more control over who can access your server, as we can configure the authorized_keys file to only allow specific users or IP addresses to connect. This is not possible with HTTPS.
Here are the steps I usually follow to set up SSH keys with git servers.
- Create SSH Keys
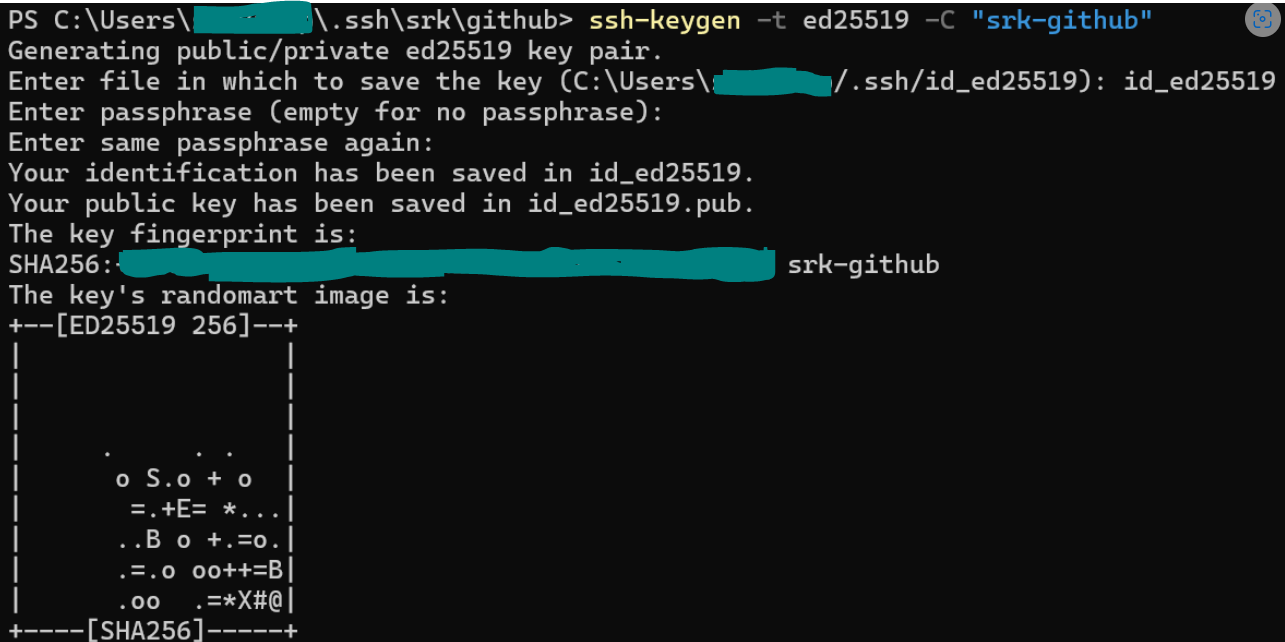
- Generate keys(private, public) using the command
ssh-keygen -t ed25519 -C "srk-GitHub"- In the above command -C “srk-GitHub” is optional, and it is a comment that gets added to your public key. The real essence of this comment can be observed when we add private keys to ssh-agent’s memory, and when we list all keys, we can see this comment at the end of each key.
- If we don’t pass the comment with
-Crandom text is appended in your *.pub file at the end of the line. - It’s a good practice to always add the comment with -C “your-comment” while generating the ssh keys
- Now, enter the private key file name with absolute or relative path. Example:
id_ed25519. Also, enter a passphrase for your private key.
- After the successful command execution 2 files will be generated
- Private key - with no file extension
- Public key - with file extension as *.pub

- Generate keys(private, public) using the command
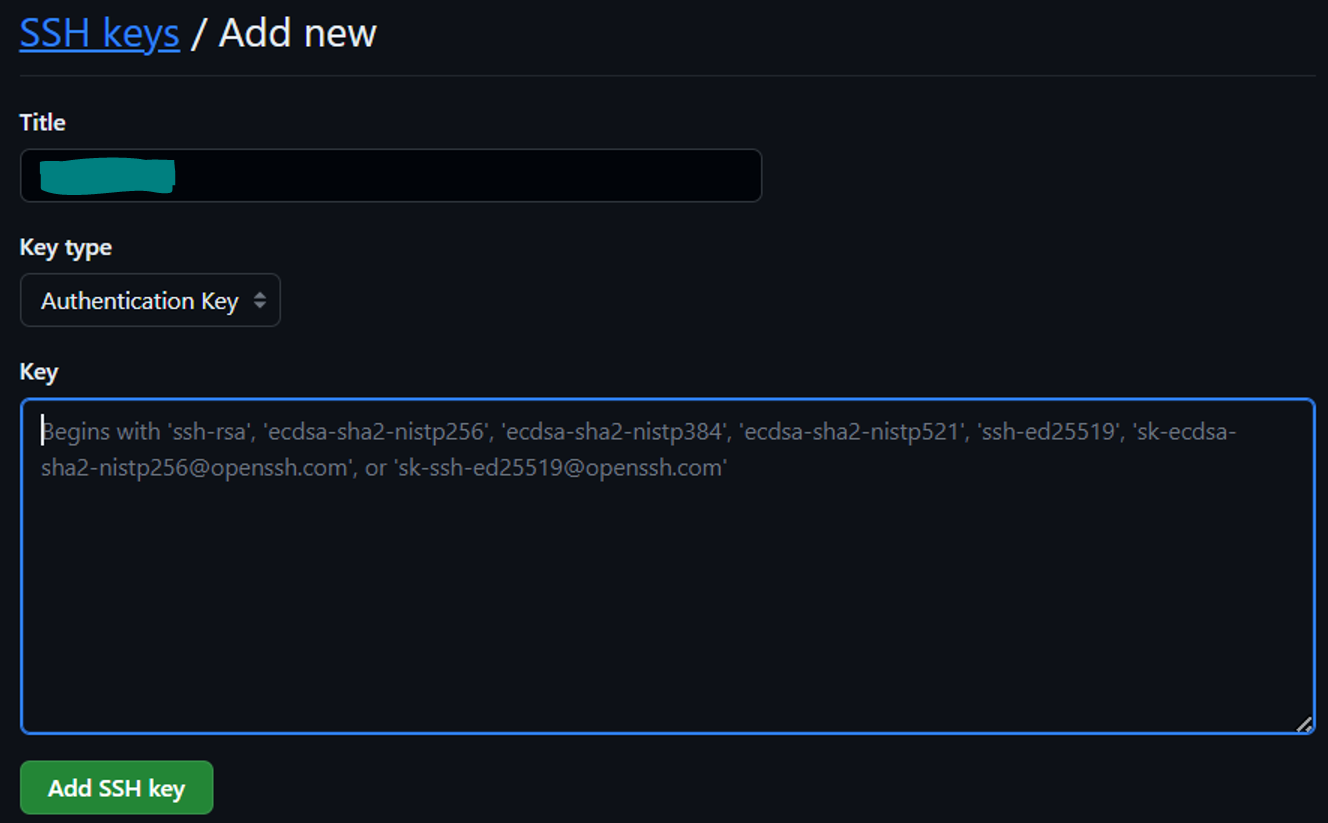
- Add SSH key to GitHub/GitLab/Bitbucket Account
- Test your SSH Connection
- Login to git server UI and create a repo to quickly verify connectivity Example repo:
test - Clone the repo to your machine using ssh
git clone git@GitHub.com:sairaghavak/test.git- Syntax:
git clone git@<host/aliasName/FQDN>:<username>/<repo-name>.git
- Once the repo is cloned to your machine, update any file usually
README.md, commit, and push. - Now, it should ask you to enter password for your private key.
- After successful password entry, it will push your code to GitHub upstream server.
-
Alternatively, we can add keys to ssh-agent by using ssh-add command, and to verify or validate the SSH connection we can use the command
ssh -T git@<hostname-registered-in-~/.ssh/config>file
- Login to git server UI and create a repo to quickly verify connectivity Example repo:
Managing multiple SSH Keys
From the above steps it’s clear that we have to enter password of your private key every time we want to push the code. On top of that if we are working on multiple projects we have to remember all private key passwords and enter them when we push code for each project.
To overcome this, we have to use ssh-agent an identity manager to manage all your identities/SSH Keys
- Create a
configfile under~/.sshdirectory i.e.,~/.ssh/config -
Here is how my ssh config would look like
# sairaghavak customized config
HashKnownHosts=yes # the host address is hashed in known_hosts file under ~/.ssh/known_hosts

# HostName or alias name for sairaghavak GitHub
Host srk-GitHub # alias name
  AddKeysToAgent yes # we can add your private keys to ssh-agent utility
  Hostname GitHub.com # Actual server address
  user git # recommended to keep the user as git always
  IdentityFile ~/.ssh/srk/GitHub/id_ed25519 # your private key absolute path
  ForwardAgent Yes # Sometimes we might want to we share/use the same ssh-agent between Host OS and DevContainer

# HostName or alias name for sairaghavak gitlab
Host srk-gitlab
  AddKeysToAgent yes
  Hostname gitlab.com
  user git
  IdentityFile ~/.ssh/srk/gitlab/id_ed25519
  ForwardAgent Yes
Note: With the above config the command to clone repo has to be changed. Example:
git clone git@srk-GitHub:sairaghavak/test.git - Start
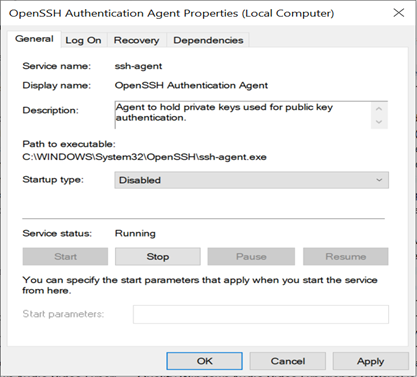
ssh-agent- Windows
- Linux
- To start an SSH Agent use the following command
eval $(ssh-agent -s) - To check if ssh-agent is started use the command
echo $SSH_AUTH_SOCK. That should print a response like/tmp/ssh-XXXXXXkF9FDx/agent.4238
- To start an SSH Agent use the following command
- Optional Step: Delete Keys: Delete all the existing keys to start from clean slate
ssh-add -Dwill delete all your identitiesssh-add -d <path-to-your-private-key-or-identity-file>will delete a specific identity
- Add keys: Once, ssh-agent is up and running now we can add all our identities/private keys as a one time setup using
ssh-addutility - List Keys: After, all the identities are added, we can review them using command
-
Note:
ssh-agentgenerally stores identities in memory, meaning whenever the service is killed or terminated all the identities are removed. This has been the behavior of ssh-agent in Linux. However, in windows OpenSSH, the identities remain even after system shutdowns and restarts.
Validating SSH Connection
- To validate your SSH connectivity with upstream GitHub we use the following command
ssh -T git@srk-GitHub- Summary of how this command works:
- the SSH client (ssh) reads your ~/.ssh/config file to see if there is a Host section that matches
srk-GitHub. If there is, it uses the configuration settings specified in that section (including any specified IdentityFile) to try to authenticate with the server. - If there is no Host section in the ~/.ssh/config file, then the client will look for the default location of the private key (~/.ssh/id_rsa), and check if the corresponding public key is associated with your GitHub account.
- When the key is already added to the ssh-agent, the authentication is performed using the key without any need for user intervention. Else if the key is not added to the ssh-agent, then the client will prompt we to enter the passphrase to unlock the private key.
- If the authentication is successful, then the server responds with a welcome message and the connection is established. If the authentication fails, the SSH client will exit with an error message.
- the SSH client (ssh) reads your ~/.ssh/config file to see if there is a Host section that matches
- At this step, it has to add the upstream GitHub server ipaddress and will add an entry in your
known_hostsfile in~/.ssh/known_hosts - Finally, it should print a message like this
Hi sairaghavak! we've successfully authenticated, but GitHub does not provide shell access 
Git Configs
- Git configs can be created at global/system level and can be inherited and overridden in each cloned repository.
- Here are my sample git configs
-
Global git config:
~/.gitconfig[core] editor = code --wait # Upon git commit, it will open a new tab in foreground within currently running vscode to enter commit message and only after closing this tab, the commit message on bash prompt is released and freezed. eol = lf # end of line(eol) is line feed(lf) autocrlf = input # input if your repo is cloned on linux or (mac/OSX), for windows use value true: Read: https://docs.GitHub.com/en/get-started/getting-started-with-git/configuring-git-to-handle-line-endings?platform=windows sshCommand = C:/Windows/System32/OpenSSH/ssh.exe # This is on windows, good to mention specific targeted ssh util path. There could be multiple ssh clients installed on your machine. The value on linux could be /usr/bin/ssh or the absolute path of your ssh [pull] rebase = false # false meaning, when you do git pull, it will do merge instead of rebase. For further info, read more or merge vs rebase strategies. -
Local git config inside a repository:
~/.git/config# Repository specific git config overrides and inherits props from ~/.gitconfig [user] name = <git-registered-account-username> email = <git-registered-email-linked-with-git-username> [core] editor = code --wait eol = lf autocrlf = input # if your repo is cloned on linux or (mac/osx), otherwise if it is cloned on windows it is true sshCommand = /usr/bin/ssh # on linux, this value is the result of command which ssh [remote "origin"] url = git@<host-or-alias-name as defined in ~/.ssh/config>:<git-username>/<repo-name>.git fetch = +refs/heads/*:refs/remotes/origin/* [branch "main"] remote = origin merge = refs/heads/main
-
References:


